This is the multi-page printable view of this section. Click here to print.
Neurocontainers
1 - CVMFS
Install the CernVM File System (CVMFS)
To begin, install CVMFS. Follow the official instructions here: https://cvmfs.readthedocs.io/en/stable/cpt-quickstart.html#getting-the-software
An example installation for Ubuntu in Windows Subsystem for Linux (WSL) would look like this:
sudo apt-get install lsb-release
wget https://ecsft.cern.ch/dist/cvmfs/cvmfs-release/cvmfs-release-latest_all.deb
sudo dpkg -i cvmfs-release-latest_all.deb
rm -f cvmfs-release-latest_all.deb
sudo apt-get update
sudo apt-get install build-essential
sudo apt-get install cvmfs
Ubuntu 24.04 might have an issue with this, so try installing dependies manually:
sudo apt install libattr1=1:2.5.2-1build1 libuuid1=2.39.3-9ubuntu6Configure CVMFS
Once installed create the keys and configure the servers used:
sudo mkdir -p /etc/cvmfs/keys/ardc.edu.au/


echo "-----BEGIN PUBLIC KEY-----
MIIBIjANBgkqhkiG9w0BAQEFAAOCAQ8AMIIBCgKCAQEAwUPEmxDp217SAtZxaBep
Bi2TQcLoh5AJ//HSIz68ypjOGFjwExGlHb95Frhu1SpcH5OASbV+jJ60oEBLi3sD
qA6rGYt9kVi90lWvEjQnhBkPb0uWcp1gNqQAUocybCzHvoiG3fUzAe259CrK09qR
pX8sZhgK3eHlfx4ycyMiIQeg66AHlgVCJ2fKa6fl1vnh6adJEPULmn6vZnevvUke
I6U1VcYTKm5dPMrOlY/fGimKlyWvivzVv1laa5TAR2Dt4CfdQncOz+rkXmWjLjkD
87WMiTgtKybsmMLb2yCGSgLSArlSWhbMA0MaZSzAwE9PJKCCMvTANo5644zc8jBe
NQIDAQAB
-----END PUBLIC KEY-----" | sudo tee /etc/cvmfs/keys/ardc.edu.au/neurodesk.ardc.edu.au.pub

echo "CVMFS_USE_GEOAPI=yes" | sudo tee /etc/cvmfs/config.d/neurodesk.ardc.edu.au.conf

echo 'CVMFS_SERVER_URL="http://cvmfs-geoproximity.neurodesk.org/cvmfs/@fqrn@;http://cvmfs.neurodesk.org/cvmfs/@fqrn@;http://s1osggoc-cvmfs.openhtc.io:8080/cvmfs/@fqrn@;http://s1fnal-cvmfs.openhtc.io:8080/cvmfs/@fqrn@;http://s1sampa-cvmfs.openhtc.io:8080/cvmfs/@fqrn@;http://s1brisbane-cvmfs.openhtc.io/cvmfs/@fqrn@;http://s1nikhef-cvmfs.openhtc.io/cvmfs/@fqrn@;http://s1bnl-cvmfs.openhtc.io/cvmfs/@fqrn@;http://s1perth-cvmfs.openhtc.io/cvmfs/@fqrn@;http://cvmfs-stratum-one.ihep.ac.cn:8000/cvmfs/@fqrn@"' | sudo tee -a /etc/cvmfs/config.d/neurodesk.ardc.edu.au.conf

echo 'CVMFS_KEYS_DIR="/etc/cvmfs/keys/ardc.edu.au/"' | sudo tee -a /etc/cvmfs/config.d/neurodesk.ardc.edu.au.conf

echo "CVMFS_HTTP_PROXY=DIRECT" | sudo tee  /etc/cvmfs/default.local
echo "CVMFS_QUOTA_LIMIT=5000" | sudo tee -a  /etc/cvmfs/default.local

sudo cvmfs_config setup
You can use the list above, but you can also pick a subset of servers that are close to you or fit your usecase better. To better understand what to choose, we use the following CVMFS server setup:
These CVMFS Stratum 1 servers are hosted by the Open Science Grid and every server has a Cloudflare CDN alias that is correctly geo-located through the Maxmind GEOAPI service in the CVMFS client:
- Illinois, USA: s1fnal-cvmfs.openhtc.io:8080 -> cvmfs-s1fnal.opensciencegrid.org:8000
- Nebraska, USA: s1osggoc-cvmfs.openhtc.io:8080 -> cvmfs-s1goc.opensciencegrid.org:8000
- New York, US: s1bnl-cvmfs.openhtc.io:8080 -> cvmfs-s1bnl.opensciencegrid.org:8000
- Oxford, UK: s1ral-cvmfs.openhtc.io:8080 -> cvmfs-egi.gridpp.rl.ac.uk:8000
- Netherlands, Europe: s1nikhef-cvmfs.openhtc.io:8080 -> cvmfs01.nikhef.nl:8000
This server is currently down:
- Sao Paulo, Brazil: s1sampa-cvmfs.openhtc.io:8080 -> sampacs01.if.usp.br:8000
These CVMFS Stratum 1 servers are hosted by ARDC Nectar Cloud and also has a Cloudflare CDN alias.
- Brisbane, Queensland, Australia: s1brisbane-cvmfs.openhtc.io -> cvmfs-brisbane.neurodesk.org
- Sydney, New South Wales, Australia: s1sydney-cvmfs.openhtc.io -> cvmfs-sydney.neurodesk.org
- Melbourne, Victoria, Australia: s1melbourne-cvmfs.openhtc.io -> cvmfs-melbourne.neurodesk.org
- Perth, Western Australia, Australia: s1perth-cvmfs.openhtc.io -> cvmfs-perth.neurodesk.org
This CVMFS Stratum 1 server is hosted by AWS:
- Frankfurt, Germany: cvmfs-frankfurt.neurodesk.org -> ec2-3-72-92-91.eu-central-1.compute.amazonaws.com
This CMVFS Stratum 1 server is hosted by Jetstream:
- Indiana, US: cvmfs-jetstream.neurodesk.org -> 149.165.172.188
This CVMFS Stratum 1 server is hosted by IHEP:
- Beijing, China: s1ihep-cvmfs.openhtc.io:8080 -> cvmfs-stratum-one.ihep.ac.cn:8000
Then we have a one geolocation-steered domain: cvmfs-geoproximity.neurodesk.org
153.02 (Longitude),-27.46 (Latitude) -> cvmfs-brisbane.neurodesk.org
151.2073, -33.8678 -> cvmfs-sydney.neurodesk.org
115.86,-31.95 -> cvmfs-perth.neurodesk.org
-88.30,41.84 -> cvmfs-s1fnal.opensciencegrid.org
-96.66,40.83 -> cvmfs-s1goc.opensciencegrid.org
-1.26, 51.75 -> cvmfs-egi.gridpp.rl.ac.uk
4.90,52.37 -> cvmfs01.nikhef.nl
8.68,50.11 -> ec2-3-72-92-91.eu-central-1.compute.amazonaws.com
-46.63,-23.54 -> sampacs01.if.usp.br
-86.45,39.22 -> cvmfs-jetstream.neurodesk.org
145.13,-37.92 -> cvmfs-melbourne.neurodesk.org
116.39,39.91 -> cvmfs-stratum-one.ihep.ac.cn
Every location has a health check attached to it and doesn’t forward to it if the destination is not working.
Then we have 3 direct URLS without CDNs as well that are geolocation-steered: cvmfs1.neurodesk.org: South America -> sampacs01.if.usp.br North America -> cvmfs-s1fnal.opensciencegrid.org Default -> cvmfs-brisbane.neurodesk.org Europe -> ec2-3-72-92-91.eu-central-1.compute.amazonaws.com Asia -> cvmfs-perth.neurodesk.org
cvmfs2.neurodesk.org: North America -> cvmfs-s1goc.opensciencegrid.org Europe -> cvmfs01.nikhef.nl Default -> cvmfs-s1goc.opensciencegrid.org
cvmfs3.neurodesk.org: North America -> cvmfs-s1bnl.opensciencegrid.org Asia -> cvmfs-brisbane.neurodesk.org Default -> cvmfs-s1bnl.opensciencegrid.org Oceania -> cvmfs-perth.neurodesk.org
This server is currently NOT working and is NOT YET mirroring our repository (we are waiting for RAL to come back online, then the others will mirror that):
- Swinburne, Australia: s1swinburne-cvmfs.openhtc.io:8080 -> cvmfs-s1.hpc.swin.edu.au:8000
For WSL users
You will need to run this for each new WSL session:
sudo cvmfs_config wsl2_startTest if the connection works:
sudo cvmfs_config chksetup

ls /cvmfs/neurodesk.ardc.edu.au

sudo cvmfs_talk -i neurodesk.ardc.edu.au host info

cvmfs_config stat -v neurodesk.ardc.edu.au
For Ubuntu 22.04 users
If configuring CVMFS returns the following error:
Error: failed to load cvmfs library, tried: './libcvmfs_fuse3_stub.so' '/usr/lib/libcvmfs_fuse3_stub.so' '/usr/lib64/libcvmfs_fuse3_stub.so' './libcvmfs_fuse_stub.so' '/usr/lib/libcvmfs_fuse_stub.so' '/usr/lib64/libcvmfs_fuse_stub.so'
./libcvmfs_fuse3_stub.so: cannot open shared object file: No such file or directory
/usr/lib/libcvmfs_fuse3_stub.so: cannot open shared object file: No such file or directory
/usr/lib64/libcvmfs_fuse3_stub.so: cannot open shared object file: No such file or directory
./libcvmfs_fuse_stub.so: cannot open shared object file: No such file or directory
libcrypto.so.1.1: cannot open shared object file: No such file or directory
/usr/lib64/libcvmfs_fuse_stub.so: cannot open shared object file: No such file or directory


Failed to read CernVM-FS configuration
A temporary workaround is:
wget https://mirror.umd.edu/ubuntu/ubuntu/pool/main/o/openssl/libssl1.1_1.1.1f-1ubuntu2.15_amd64.deb
dpkg -i libssl1.1_1.1.1f-1ubuntu2.15_amd64.deb
Install singularity/apptainer
e.g for Ubuntu/Debian install apptainer:
sudo apt-get install -y software-properties-common
sudo add-apt-repository -y ppa:apptainer/ppa
sudo apt-get update
sudo apt-get install -y apptainer
sudo apt-get install -y apptainer-suid
e.g. for Ubuntu/Debian install singularity:
export VERSION=1.18.3 OS=linux ARCH=amd64 && \
    wget https://dl.google.com/go/go$VERSION.$OS-$ARCH.tar.gz && \
    sudo tar -C /usr/local -xzvf go$VERSION.$OS-$ARCH.tar.gz && \
    rm go$VERSION.$OS-$ARCH.tar.gz

echo 'export GOPATH=${HOME}/go' >> ~/.bashrc && \
    echo 'export PATH=/usr/local/go/bin:${PATH}:${GOPATH}/bin' >> ~/.bashrc && \
    source ~/.bashrc

go get -d github.com/sylabs/singularity

export VERSION=v3.10.0 # or another tag or branch if you like && \
    cd $GOPATH/src/github.com/sylabs/singularity && \
    git fetch && \
    git checkout $VERSION # omit this command to install the latest bleeding edge code from master

export VERSION=3.10.0 && # adjust this as necessary \
    mkdir -p $GOPATH/src/github.com/sylabs && \
    cd $GOPATH/src/github.com/sylabs && \
    wget https://github.com/sylabs/singularity/releases/download/v${VERSION}/singularity-ce-${VERSION}.tar.gz && \
    tar -xzf singularity-ce-${VERSION}.tar.gz && \789
    cd ./singularity-ce-${VERSION} && \
    ./mconfig --without-seccomp --without-conmon

./mconfig --without-seccomp --without-conmon && \
    make -C ./builddir && \
    sudo make -C ./builddir install

export PATH="/usr/local/singularity/bin:${PATH}"
Use of Neurodesk CVMFS containers
The containers are now available in /cvmfs/neurodesk.ardc.edu.au/containers/ and can be started with:
singularity shell /cvmfs/neurodesk.ardc.edu.au/containers/itksnap_3.8.0_20201208/itksnap_3.8.0_20201208.simgmake sure that SINGULARITY_BINDPATH includes the directories you want to work with:
export SINGULARITY_BINDPATH='/cvmfs,/mnt,/home'For WSL users
The homedirectory might not be supported. Avoid mounting it with
singularity shell --no-home /cvmfs/neurodesk.ardc.edu.au/containers/itksnap_3.8.0_20201208/itksnap_3.8.0_20201208.simgor configure permanently:
sudo vi /etc/singularity/singularity.confset
mount home = noInstall module system
sudo yum install lmodor
sudo apt install lmodUse of containers in the module system
Configuration for module system
Create a the new file /usr/share/module.sh with the content (NOTE: update the version, here 6.6, with your lmod version, e.g. 6.6 (Ubuntu 20.04/22.04), 8.6.19 (Ubuntu 24.04)):
# system-wide profile.modules                                          #
# Initialize modules for all sh-derivative shells                      #
#----------------------------------------------------------------------#
trap "" 1 2 3

case "$0" in
    -bash|bash|*/bash) . /usr/share/lmod/YOURLMODVERSION_HERE/init/bash ;;
       -ksh|ksh|*/ksh) . /usr/share/lmod/YOURLMODVERSION_HERE/init/ksh ;;
       -zsh|zsh|*/zsh) . /usr/share/lmod/YOURLMODVERSION_HERE/init/zsh ;;
          -sh|sh|*/sh) . /usr/share/lmod/YOURLMODVERSION_HERE/init/sh ;;
                    *) . /usr/share/lmod/YOURLMODVERSION_HERE/init/sh ;;  # default for scripts
esac

trap - 1 2 3
Make the module system usable in the shell
Add the following lines to your ~/.bashrc file or to /etc/bash.bashrc for a global install:
if [ -f '/usr/share/module.sh' ]; then source /usr/share/module.sh; fi

if [ -d /cvmfs/neurodesk.ardc.edu.au/neurodesk-modules ]; then
        # export MODULEPATH="/cvmfs/neurodesk.ardc.edu.au/neurodesk-modules"
        module use /cvmfs/neurodesk.ardc.edu.au/neurodesk-modules/*
else
        export MODULEPATH="/neurodesktop-storage/containers/modules"
        module use $MODULEPATH
        export CVMFS_DISABLE=true
fi

if [ -f '/usr/share/module.sh' ]; then
        echo 'Run "ml av" to see which tools are available - use "ml <tool>" to use them in this shell.'
        if [ -v "$CVMFS_DISABLE" ]; then
                if [ ! -d $MODULEPATH ]; then
                        echo 'Neurodesk tools not yet downloaded. Choose tools to install from the Application menu.'
                fi
        fi
fi
Restart the current shell or run
source ~/.bashrcUse of containers in the module system
export SINGULARITY_BINDPATH='/cvmfs,/mnt,/home'
module use /cvmfs/neurodesk.ardc.edu.au/neurodesk-modules/*
ml fsl
fslmaths
Troubleshooting and diagnostics
# Check servers
sudo cvmfs_talk -i neurodesk.ardc.edu.au host probe
sudo cvmfs_talk -i neurodesk.ardc.edu.au host info

# Change settings
sudo touch /var/log/cvmfs_debug.log.cachemgr
sudo chown cvmfs /var/log/cvmfs_debug.log.cachemgr
sudo touch /var/log/cvmfs_debug.log
sudo chown cvmfs /var/log/cvmfs_debug.log

sudo vi /etc/cvmfs/config.d/neurodesk.ardc.edu.au.conf
echo -e "\nCVMFS_DEBUGLOG=/var/log/cvmfs_debug.log" | sudo tee -a /etc/cvmfs/default.local
cat /etc/cvmfs/default.local
sudo cvmfs_config umount
sudo service autofs stop
sudo mount -t cvmfs neurodesk.ardc.edu.au /cvmfs/neurodesk.ardc.edu.au
# check if new settings are applied correctly:
cvmfs_config showconfig neurodesk.ardc.edu.au

cat /var/log/cvmfs_debug.log
cat /var/log/cvmfs_debug.log.cachemgr
2 - DataLad
Using Neurodesk Containers with DataLad
This page explains how to use DataLad and the ReproNim containers with Neurodesk tools.
Install DataLad, datalad-container, and the ReproNim containers repository
conda install datalad
pip install datalad_container
datalad install https://github.com/ReproNim/containers.git
cd containers
List all default available containers
datalad containers-listDownload and run the latest container version
datalad containers-run -n neurodesk-romeoChange version of container
You can change which version of a container is used in two ways:
Option 1: change version in .datalad/config
vi .datalad/config
# now change the version of the container you like
# all available containers can be seen via `ls images/neurodesk`
datalad save -m 'downgraded version of romeo to x.x.x'
datalad containers-run -n neurodesk-romeo
Option 2: change version using freeze_versions script
# all available containers can be seen via `ls images/neurodesk`
scripts/freeze_versions neurodesk-romeo=3.2.4
datalad save -m 'downgraded version of romeo to 3.2.4'
datalad containers-run -n neurodesk-romeo
3 - Docker
Our containers are automatically built in https://github.com/neurodesk/neurocontainers/ and hosted on dockerhub and on github
Pull Docker containers
e.g. for a julia container docker
docker pull vnmd/julia_1.6.1You an also build singularity images from dockerhub
singularity build julia_1.6.1.simg docker://vnmd/julia_1.6.1Replace julia_1.6.1 with your selected application. You can find the available containers here: https://neurodesk.org/applications/
4 - OpenRecon
Build an OpenRecon/FIRE package
Choose a development environment
| Development path | Complete these setup sections | Continue at |
|---|---|---|
| Local workstation | 1. Set up a local computer; 2. Fork and set up Neurocontainers locally | 4. Complete example |
| GitHub Codespaces | 3. Set up Neurocontainers in GitHub Codespaces | 4. Complete example |
1. Set up on a local computer
You need Git, Docker, Python 3.13, and Visual Studio Code. A GitHub account is required when you are ready to fork repositories, use Codespaces, or submit changes.
This was tested with Python 3.10 to 3.13.
Windows
Use WSL 2 with a Linux distribution such as Ubuntu. Install Docker Desktop with its WSL 2 backend and enable integration for that distribution. Install the VS Code WSL extension, open the checkout from WSL with code ., and run every command in this guide in the WSL terminal.
Keep the checkout in the WSL filesystem, for example under ~/src, rather than under /mnt/c; Docker bind mounts perform better there. Do not run the Bash build scripts from Command Prompt or PowerShell.
Install Python 3.13 inside the WSL distribution. If the distribution does not provide Python 3.13, use the uv option described under Linux below.
macOS
Install Docker Desktop and start it. Install Git, Python, and 7-Zip with your preferred package manager. Example with Homebrew (https://brew.sh):
# To install homebrew in case you don't have it yet:
/bin/bash -c "$(curl -fsSL https://raw.githubusercontent.com/Homebrew/install/HEAD/install.sh)"
brew install git python@3.13 p7zipLinux
Install Git, Python 3.13 with venv support, 7-Zip, and Docker Engine using your distribution’s instructions. Configure Docker so your normal user can run it, then log out and back in if the group membership changed.
For Debian or Ubuntu, the prerequisites are:
sudo apt update
sudo apt install -y git curl p7zip-full
If your distribution does not package Python 3.13, install it with uv:
curl -LsSf https://astral.sh/uv/install.sh | sh
export PATH="$HOME/.local/bin:$PATH"
uv python install 3.13
Verify the fundamentals
Open a new terminal and check each tool before cloning the source:
git --version
python3.13 --version
docker version
docker run --rm hello-world
docker buildx version
docker run --rm --platform linux/amd64 alpine uname -m
Configure the identity Git will record in your commits:
git config --global user.name "YOUR NAME"
git config --global user.email "YOUR GITHUB EMAIL"
The Python command must report 3.13.x, and the last Docker command should print x86_64. If docker version cannot reach the server, start Docker Desktop or the Linux Docker service before continuing.
2. Fork and set up Neurocontainers locally
Fork neurodesk/neurocontainers into your GitHub account, then clone your fork. Replace YOUR_GITHUB_USERNAME below:
git clone https://github.com/YOUR_GITHUB_USERNAME/neurocontainers.git
cd neurocontainers
git remote add upstream https://github.com/neurodesk/neurocontainers.git
git switch -c add-MYPROJECT-openrecon
Create an isolated Python environment and install these dependencies:
python3.13 -m venv .venv
source .venv/bin/activate
python --version  # Must report Python 3.13.x
python -m pip install --upgrade pip
python -m pip install -r requirements.txt
python -m pip install -e .

sf-build --help
Activate the environment with source .venv/bin/activate whenever you open a new terminal.
3. Set up Neurocontainers in GitHub Codespaces
Use this section instead of sections 1 and 2 when Docker and Python are not available on your computer.
Make sure your fork’s
mainbranch is up to date, then select Code > Codespaces > Create codespace on main. The repository’s development-container configuration installs Python 3.13, creates theenvvirtual environment, installs Neurocontainers, and connects the codespace to a Docker daemon.When setup finishes, create a new branch, activate the environment, and verify both Neurocontainers and Docker:
git switch -c add-MYPROJECT-openrecon
source env/bin/activate
python --version  # Must report Python 3.13.x
python -m builder --help
sf-build --help
docker info
docker run --rm hello-world
Continue with section 4. The
openreconi2iexamplerecipe,fulltest.yaml,sf-login, and MRD server/client commands are the same as in a local Linux environment.Use the preinstalled H5Web extension to inspect
.h5outputs and niivue for.nii.Never upload identifiable DICOM data to the codespace or commit private test data.
A codespace is an interactive, time-limited development environment. GitHub’s default idle timeout is 30 minutes and the maximum user-configurable timeout is 4 hours; when a codespace stops, its running processes stop too. Use the pull-request workflow in section 9 for builds that must continue unattended.
4. Complete example: build and run openreconi2iexample
Run this example before creating your own recipe. All commands in this section start in the root of your neurocontainers checkout with its Python 3.13 environment active. For a local checkout, run:
cd /PATH/TO/neurocontainers
source .venv/bin/activate
python --version  # Must report Python 3.13.x
In GitHub Codespaces, the checkout is already under /workspaces and the configured environment is named env:
cd /workspaces/neurocontainers
source env/bin/activate
python --version  # Must report Python 3.13.x
Optional: Validate the example
Validate the recipe and scanner label, then run its focused Python tests:
python builder/validation.py \
  recipes/openreconi2iexample/build.yaml --verbose

python workflows/validate_openrecon_labels.py \
  recipes/openreconi2iexample/OpenReconLabel.json

python -m pytest \
  recipes/openreconi2iexample/test_openreconi2iexample.py -q
Check the bundled DICOM test data
The archive is approximately 9 MB and contains 160 .IMA DICOM files. The conversion will create a much larger local MRD file, so keep generated data under local-test. The following exclusion is local to your checkout and does not modify the repository’s shared .gitignore:
grep -qxF 'recipes/openreconi2iexample/local-test/' .git/info/exclude || \
  echo 'recipes/openreconi2iexample/local-test/' >> .git/info/exclude

mkdir -p recipes/openreconi2iexample/local-test
Build the x86_64 image and enter it
sf-login stages the recipe, builds openreconi2iexample:<version> for linux/amd64, mounts the recipe directory at /buildhostdirectory, and opens a shell in the new container:
sf-login openreconi2iexample --recreate --architecture x86_64The first build can take a while. On Apple Silicon or another ARM64 host, Docker runs this x86_64 image through emulation.
Inside the container, verify the installed example and server:
openreconi2iexample
python3 /opt/code/python-ismrmrd-server/main.py --help | head
The first command should print openreconi2iexample followed by the current recipe version.
Convert the bundled DICOM data to an ISMRMRD HDF5 file
The recipe directory is mounted at /buildhostdirectory, so both committed test assets are available inside the container. First extract the archive there using Python’s standard-library ZIP support:
python3 -m zipfile -e \
  /buildhostdirectory/GR_M_5_QSM_p2_1mmIso_TE20.zip \
  /buildhostdirectory/local-test/dicom

find /buildhostdirectory/local-test/dicom -type f \
  \( -iname '*.ima' -o -iname '*.dcm' \) | wc -l
The count should be 160. Now run the recipe-local dicom2mrd.py inside the container. It reads the DICOM tree recursively and writes image MRD data to the dataset group in an ISMRMRD HDF5 file:
python3 /buildhostdirectory/dicom2mrd.py \
  -o /buildhostdirectory/local-test/input_data.h5 \
  -g dataset \
  /buildhostdirectory/local-test/dicom
The converter should report one series containing 160 images. Verify the resulting file /buildhostdirectory/local-test/input_data.h5 before starting the server by opening it in the H5Web hdf viewer inside VScode.
The generated HDF5 file remains on the host under recipes/openreconi2iexample/local-test/input_data.h5 after you exit the container.
Start the MRD server and run the client
Still inside the container, write the parameter payload that reproduces the scanner label’s default behavior:
cat > /buildhostdirectory/local-test/openreconi2iexample.json <<'JSON'
{
  "parameters": {
    "sendoriginal": true,
    "invert": true,
    "segment": true,
    "segmentheadergeometry": "2d_segment_header"
  }
}
JSON
The MRD client automatically sends this file as additional configuration because its basename matches -c openreconi2iexample. Start the server in the background, send the input, and stop the server afterward:
python3 /opt/code/python-ismrmrd-server/main.py \
  -v -r -H=0.0.0.0 -p=9002 -s -S=/tmp/share/saved_data \
  > /buildhostdirectory/local-test/server.log 2>&1 &
server_pid=$!
trap 'kill "$server_pid" 2>/dev/null || true' EXIT
sleep 2

cd /buildhostdirectory/local-test
python3 /opt/code/python-ismrmrd-server/client.py \
  -G dataset \
  -o openrecon_output.h5 \
  input_data.h5 \
  -c openreconi2iexample

kill "$server_pid" 2>/dev/null || true
wait "$server_pid" 2>/dev/null || true
trap - EXIT
This explicit parameter payload sends original images, inverted images, and a simple foreground segmentation. For a straightforward single-series magnitude input, expect output groups image_99, image_100, and image_101. More complex inputs can be split into additional groups.
Open recipes/openreconi2iexample/local-test/openrecon_output.h5 with the VS Code H5Web extension to inspect the returned images.
Exit the container, run the deploy smoke test against the image, and prove that the expected local tag exists:
exit

sf-test openreconi2iexample --architecture x86_64
Build the example OpenRecon and FIRE packages
From the directory containing your neurocontainers checkout, clone the packaging repository and create its Python 3.13 environment:
cd ..
git clone https://github.com/neurodesk/openrecon.git
cd openrecon

python3.13 -m venv .venv
source .venv/bin/activate
python --version  # Must report Python 3.13.x
python -m pip install --upgrade pip
python -m pip install jsonschema packaging
The checked-in recipes/openreconi2iexample/params.sh must name the same version you just built. Assert that it matches before starting the package build.
Build both scanner formats from the local Docker image:
cd recipes/openreconi2iexample
/bin/bash ../build.sh --local-cache
The OpenRecon zip is installable through the OpenRecon package mechanism; the FIRE directory contains its Ice tree and INSTALL_FIRE.txt.
Once this complete example works, return to your Neurocontainers checkout and adapt the recipe for your own application.
5. Create a new Neurocontainer recipe
Use a short lowercase name containing only letters and numbers, for example myrecon. Published OpenRecon recipe names must not contain underscores.
For a new image-to-image application, start from openreconi2iexample. For a new kspace-to-complex-image application, start from sodiumgridding.
cp -R recipes/openreconi2iexample recipes/myrecon
mv recipes/myrecon/openreconi2iexample.py recipes/myrecon/myrecon.py
mv recipes/myrecon/test_openreconi2iexample.py recipes/myrecon/test_myrecon.py
code recipes/myrecon
Use VS Code’s search-and-replace to change openreconi2iexample to myrecon, then adapt the copied files.
Your recipe should include at least:
build.yaml: container name, version, x86_64 architecture, dependencies, files, and build directives;- your Python MRD application module;
OpenReconLabel.json: resource requirements, and user parameters;OpenReconREADME.md: scanner-facing documentation that becomes the package README/PDF;fulltest.yaml: CI runtime tests for the released container; and- focused tests for the application logic where practical.
The recipe must install the Python MRD server macro:
architectures:
  - x86_64

build:
  kind: neurodocker
  base-image: ubuntu:22.04
  pkg-manager: apt
  directives:
    - include: macros/openrecon/neurodocker.yaml
Declare application files in the top-level files list and copy them into /opt/code/python-ismrmrd-server in a build directive. Keep the following identities synchronized:
nameandversioninbuild.yaml;nameandversioninfulltest.yaml;- the package
idand theconfigchoice/default inOpenReconLabel.json; and - the Python module name passed to the MRD client with
-c.
The OpenRecon 1.1.0 schema allows at most 14 parameters, including config. Every choice parameter must have a non-empty default that exactly matches one of its value IDs.
Keep VERSION_WILL_BE_REPLACED_BY_SCRIPT in the label’s version and version-derived regulatory fields. The packaging build replaces this placeholder with the version from params.sh before validating and assembling the package.
Keep OpenReconLabel.json in the Neurocontainers recipe. Current release automation copies it into OpenRecon and creates params.sh; contributors no longer need to maintain a second copy manually. If OpenReconREADME.md is present, the automation also copies it to the openrecon package repository as README.md.
6. Validate, build, and test the Neurocontainer
Run metadata validation and any focused tests first:
python builder/validation.py recipes/myrecon/build.yaml --verbose
python workflows/validate_openrecon_labels.py
python -m pytest recipes/myrecon/test_*.py -q
Build the scanner-compatible x86_64 image and open an interactive shell in it:
sf-login myrecon --recreate --architecture x86_64On an Apple Silicon or ARM64 host, Docker emulates linux/amd64; the build can therefore be slower than a native x86_64 build. The recipe directory is mounted in the container at /buildhostdirectory.
Test the application through the MRD server
Start with a known MRD .h5 input whenever possible. To convert legacy DICOM inside the container:
mkdir -p /buildhostdirectory/local-test
cd /opt/code/python-ismrmrd-server
python3 dicom2mrd.py \
  -o /buildhostdirectory/local-test/input.h5 \
  /buildhostdirectory/local-test/dicom
Enhanced DICOM conversion is still pending upstream in python-ismrmrd-server PR 15. Until it is merged, examples of the additional converters are available as enhanceddicom2mrd.py and nifti2mrd.py. If your application needs them, declare and copy them in build.yaml.
Inside the container, start the server and send the test dataset through your configuration:
python3 /opt/code/python-ismrmrd-server/main.py \
  -v -r -H=0.0.0.0 -p=9002 -s -S=/tmp/share/saved_data &
sleep 2

python3 /opt/code/python-ismrmrd-server/client.py \
  -G dataset \
  -o /buildhostdirectory/local-test/output.h5 \
  /buildhostdirectory/local-test/input.h5 \
  -c myrecon
Confirm that the client reports the expected number and type of returned images. Inspect output.h5 with the vscode H5Web extension and inspect any NIfTI intermediates with a NIfTI-capable viewer (e.g. niivue). Test every OpenReconLabel.json option and important option combination.
Exit the container and run the builder’s deploy smoke test against the image you just built:
exit
sf-test myrecon --architecture x86_64
sf-test checks the built image’s deployment contract. Your fulltest.yaml is exercised by the current pull-request candidate workflow; it should contain meaningful application/runtime assertions.
7. Build OpenRecon and FIRE packages
First build the Neurocontainer as described above. The local Docker image must be tagged myrecon:<version>, which is the tag produced by sf-build and sf-login.
Clone the packaging repository next to your Neurocontainers checkout:
cd ..
git clone https://github.com/neurodesk/openrecon.git
cd openrecon

python3.13 -m venv .venv
source .venv/bin/activate
python --version  # Must report Python 3.13.x
python -m pip install --upgrade pip
python -m pip install jsonschema packaging
Create recipes/myrecon and copy the scanner metadata from your Neurocontainers recipe:
mkdir -p recipes/myrecon
cp ../neurocontainers/recipes/myrecon/OpenReconLabel.json recipes/myrecon/
cp ../neurocontainers/recipes/myrecon/OpenReconREADME.md recipes/myrecon/README.md
Create recipes/myrecon/params.sh with the same name and version as build.yaml:
#!/bin/bash
export toolName=myrecon
export version=1.0.0
export baseDockerImage=vnmd/${toolName}_${version}
The build checks the local Docker cache first, including myrecon:1.0.0, and falls back to baseDockerImage only when no matching local image exists. From the package recipe directory, request both artifacts:
cd recipes/myrecon
/bin/bash ../build.sh --local-cache
The packager runs a privileged nested Docker build for linux/amd64 and needs substantial temporary disk space. It also renders README.md to PDF. If mdpdf is unavailable, the build installs the required Node/NVM tooling; --ignore-mdpdf is useful only when the recipe already supplies docs.pdf or README.pdf.
The build runs as linux/amd64 and produces:
recipes/myrecon/openrecon/OpenRecon_<vendor>_<name>_V<version>.zip
recipes/myrecon/fire/FIRE_<vendor>_<name>_V<version>/
The FIRE output is a directory containing an Ice tree and INSTALL_FIRE.txt. Keep the directory structure unchanged.
Codespaces notes
If you used the Codespaces setup in section 3, the commands above work without modification: from /workspaces/neurocontainers, cd .. moves to /workspaces, where you can clone the OpenRecon repository.
FIRE images can be large and Codespaces storage is small. Check df -h before building both packages, select a larger codespace if necessary, and stop or delete the codespace when you finish to avoid unnecessary usage.
8. Install and test the scanner package
Use the package produced in section 7 for local scanner testing. The same installation procedures apply to an artifact published later through the GitHub Actions flow in section 9.
Install an OpenRecon package
Make sure that no protocol is open, because an open protocol can prevent installation of a new package.
NumarisX VA70 and above (for example, XB10)
For software versions NumarisX VA70 and above, such as NumarisX XB10, use the Numaris/Edge routine for installing OpenRecon applications. A short summary of the installation steps is provided below.
Exit Kiosk mode of your MRAWP via the keyboard shortcut
[Tab]+[Del]+[Num +].Create a folder under
C:\Temp\, e.g.C:\Temp\OR\Packages.Copy the OpenRecon package to
C:\Temp\OR\Packages.Press the Windows key and open an elevated admin CMD shell.
Change directory to
%MREDGEHOME%:cd /d "%MREDGEHOME%"Start the installation of the OpenRecon package:
syngo.MR.Digi.Utils.Console.exe store --install-package "C:\Temp\OR\Packages\OpenRecon_package.zip"The installation will take a couple of minutes. Check the progress of the installation via:
syngo.MR.Digi.Utils.Console.exe store --list
XA60 and XA61
Copy the OpenRecon zip file into C:\Program Files\Siemens\Numaris\OperationalManagement\FileTransfer\incoming.
Wait for the file to disappear.
Check whether it is being installed by watching C:\ProgramData\Siemens\Numaris\log\syngo.MR.HostInfra.OpenRecon.Watcher.
It should first create a 0 KB text file with the container name and version.
The text file then fills to about 100-200 KB.
Once the log file is written, you can open a protocol and check whether the package is available.
Run the sequence with OpenRecon enabled and check for errors in the log viewer at C:\ProgramData\Siemens\Numaris\log\OpenRecon.utr.
Install a FIRE package
Unpack the generated FIRE zip and read its INSTALL_FIRE.txt before changing the scanner. The archive root contains an Ice folder laid out like %CustomerIceProgs%, normally under MriCustomer.
Copy or merge the package’s Ice folder into MriCustomer while preserving its paths. The bundle includes the FIRE workflow files, configuration, chroot image, startup settings, and shared directories required by the package. Stop or unmount an existing FIRE chroot before replacing its .img file.
FIRE installation is a scanner-administration operation. Follow your site’s scanner-version-specific procedure and change-control process in addition to the generated instructions.
9. Build and publish through GitHub Actions
Commit and open the Neurocontainers pull request
From your Neurocontainers branch, review what will be published, then commit and push it to your fork:
git status --short
git diff --check
git add recipes/myrecon
git commit -m "Add myrecon OpenRecon recipe"
git push -u origin add-MYPROJECT-openrecon
Open a pull request from your fork to neurodesk/neurocontainers:main. Include:
- what the application does and which image/acquisition type it expects;
- the local build and MRD test commands you ran;
- the source and permission status of any public test data;
- expected returned series and important parameter combinations; and
- limitations that a scanner tester must know.
The current PR container candidate workflow accepts fork pull requests. It validates the changed recipe and OpenRecon metadata, builds every declared architecture/variant, creates Docker and SIF candidates, runs the deploy and fulltest.yaml checks and uploads an immutable candidate artifact.
What happens after merge
The current release sequence is:
- Neurocontainers promotes the exact tested candidate rather than rebuilding it.
- The image and release metadata are published.
- For a default x86_64 recipe containing
OpenReconLabel.json,sync_openrecon.pycreates or updates an OpenRecon metadata pull request. If the metadata is unchanged, it can dispatch a rebuild instead. - After the OpenRecon pull request is reviewed and merged, its
auto-buildworkflow runs the reusablebuild-appsworkflow. - That workflow builds both OpenRecon and FIRE artifacts, uploads both zips, and opens an issue containing download and installation instructions.
You therefore normally submit only the Neurocontainers pull request. Do not open a hand-written OpenRecon packaging pull request unless a maintainer asks for a packaging-only change or the automatic synchronization fails.
10. Troubleshooting and scanner notes
Package behavior and metadata
Sent image values must fit within a 4096-value range
OpenRecon can send a maximum integer range of 4096 values back to the scanner.
If the returned images exceed that range, the values can wrap around instead of clipping. The symptom is that the sent images show repeating integer wraps and can look a bit like phase images.
Scale or clamp derived image data into the scanner-safe range before sending it from the MRD server.
Choice parameters need a non-empty default
Current Neurocontainers and OpenRecon packaging validators reject a choice parameter whose default is empty or does not match one of its value IDs. Older packages created without this check could install successfully but remain unselectable in the sequence tab.
For example, this can fail because "default": "" does not match any entry in values:
{
  "id": "metricsregion",
  "label": { "en": "Metrics Region" },
  "type": "choice",
  "values": [
    {
      "id": "wholebody",
      "name": { "en": "wholebody" }
    },
    {
      "id": "abdomen",
      "name": { "en": "abdomen" }
    },
    {
      "id": "pelvis",
      "name": { "en": "pelvis" }
    },
    {
      "id": "thigh",
      "name": { "en": "thigh" }
    },
    {
      "id": "leg",
      "name": { "en": "leg" }
    }
  ],
  "default": "",
  "information": { "en": "Region passed to MuscleMap metrics" }
}
Set the default to one of the available values IDs instead:
{
  "id": "metricsregion",
  "label": { "en": "Metrics Region" },
  "type": "choice",
  "values": [
    {
      "id": "wholebody",
      "name": { "en": "wholebody" }
    },
    {
      "id": "abdomen",
      "name": { "en": "abdomen" }
    },
    {
      "id": "pelvis",
      "name": { "en": "pelvis" }
    },
    {
      "id": "thigh",
      "name": { "en": "thigh" }
    },
    {
      "id": "leg",
      "name": { "en": "leg" }
    }
  ],
  "default": "wholebody",
  "information": { "en": "Region passed to MuscleMap metrics" }
}
Scanner runtime
Do not use Prio Recon with OpenRecon
This option has to be disabled in an OpenRecon sequence:
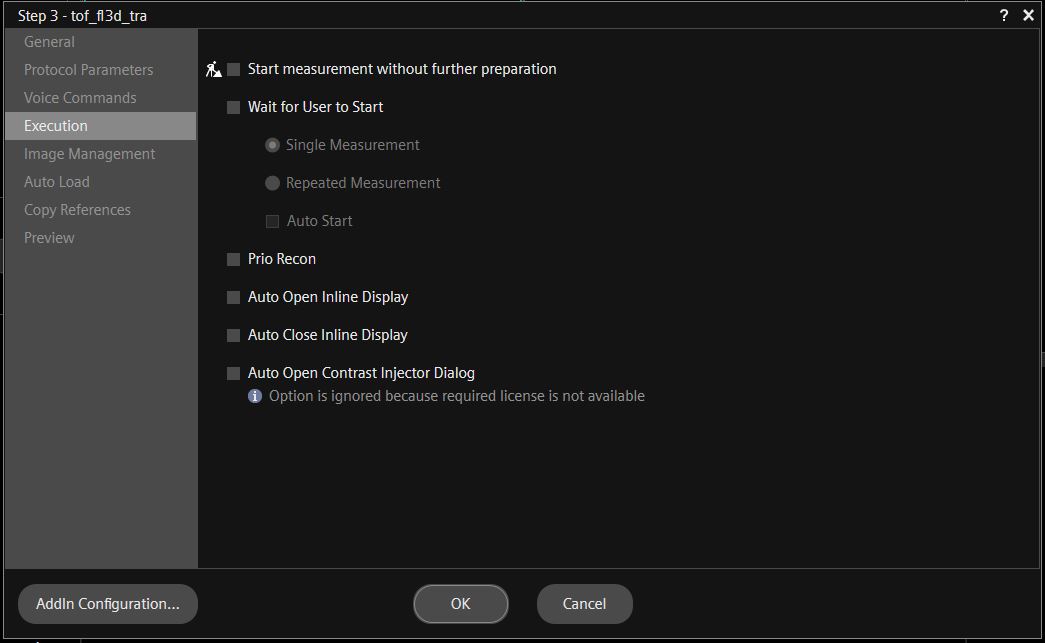
Right-click Sequence in the Scan Queue, then select Edit Properties (Alt+Enter) and Execution.
CUDA version
Make sure that you install the correct CUDA version in the container and that it does not get overwritten by a pip install. The current OpenRecon package build rejects a CUDA toolkit or PyTorch CUDA version newer than 11.8.
Always double-check in the container with:
# Check that the PyTorch CUDA version is no newer than 11.8.
python -c "import torch; print(torch.version.cuda)"
High-performance computing license side effects
For OpenRecon to work, the N_High_End_Computing license must be active on the scanner.
Activating this license takes memory away from the main ICE recon system, so normal recons might run out of memory sooner. If you need this memory back, you can temporarily disable this license and OpenRecon.
Turn the license off by commenting it out. Add # in front of the relevant lines in C:\Program Files\Siemens\Numaris\bin\Common\Licensing\license.dat.
Restart the whole system. Restarting the workspace is not enough.
Versioning and maintenance
Versioning of containers
OpenRecon requires container versions. For example, on the scanner, version 1.2.3 only shows the major version in the selection box, but hovering over the name shows the full version:
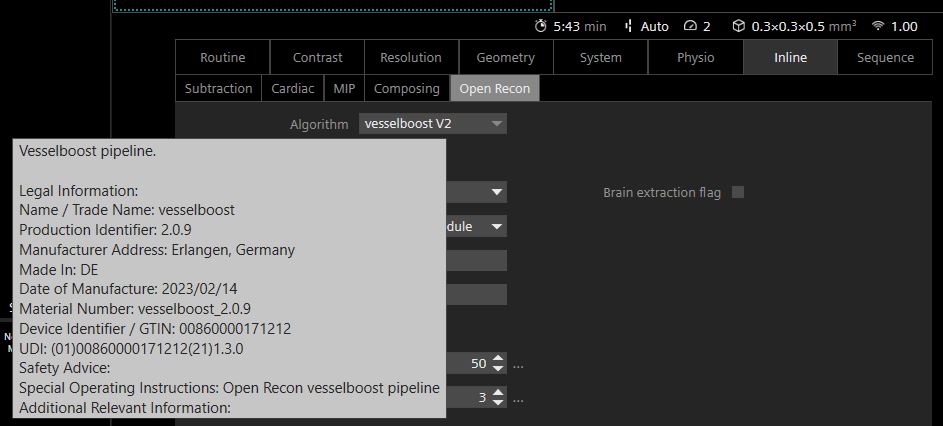
OpenRecon will not install an update to a container with the same version.
Cleaning up packages on the scanner (on XA60/61)
After installing and testing different OpenRecon containers, old containers remain in the host registry and consume space on the host C: drive.
Download wip_OpenRecon_PackageRemover_Tool.exe from the Siemens MAGNETOM forum and follow the installation instructions.
At the end of a testing session, purge the old packages by running this in the powershell:
wip_OpenRecon_PackageRemover_Tool.exe --purgeAnswer y for each package you want to purge.
Then run garbage collection to clean up the storage:
wip_OpenRecon_PackageRemover_Tool.exe --gcThis tool often breaks the OpenRecon watcher process, so installing new packages after cleanup may fail until the host is restarted. Reboot the host after cleanup before installing more OpenRecon packages.
For the deletion to work, and for the tool to see your OpenRecon package, the package needs to be labeled as Research. It will not touch OpenRecon tools labeled as Product.
Check that your OpenReconLabel.json file contains:
"content_qualification_type": "RESEARCH"5 - Singularity/Apptainer
Our docker containers are converted to singularity/apptainer containers and stored on Object storage.
Download Singularity Containers
First get an overview of which containers are available as Singularity containers: https://github.com/neurodesk/neurocommand/blob/main/cvmfs/log.txt
curl -s https://raw.githubusercontent.com/neurodesk/neurocommand/main/cvmfs/log.txtassign the container name to a variable:
export container=itksnap_3.8.0_20201208Then download the containers. One way is to use CURL:
curl -X GET https://neurocontainers.neurodesk.workers.dev/$container.simg -OSingularity Containers and GPUs
Some of our containers contain GPU-accelerated applications. Here is an example that tests the GPU accelerated program eddy in FSL:
curl -X GET https://neurocontainers.neurodesk.workers.dev/fsl_6.0.5.1_20221016.simg -O
git clone https://github.com/neurolabusc/gpu_test.git
singularity shell --nv fsl_6.0.5.1_20221016.simg
cd gpu_test/etest/
bash runme_gpu.sh
Transparent Singularity
The singularity containers can be also be used in combination with our Transparent Singularity Tool, which wraps the executables inside a container to make them easily available for pipelines. More information can be found here:
one example to do this is:
curl -s https://raw.githubusercontent.com/neurodesk/neurocommand/main/cvmfs/log.txt
export container=itksnap_3.8.0_20201208
git clone https://github.com/neurodesk/transparent-singularity ${container}
cd ${container}
./run_transparent_singularity.sh ${container}
6 - Windows 11 and Windows Subsystem for Linux
1. Install WSL
Follow the instructions to enable Windows Subsystem for Linux 2 in Windows 11: https://docs.microsoft.com/en-us/windows/wsl/install
2. Configure CVMFS, Singularity and LMOD (only needs to be done once)
Install build tools
sudo apt update
sudo apt install make gcc
Install singularity
export SINGULARITY_VERSION=3.9.3 VERSION=1.17.2 OS=linux ARCH=amd64
wget -q https://dl.google.com/go/go$VERSION.$OS-$ARCH.tar.gz
sudo tar -C /usr/local -xzvf go$VERSION.$OS-$ARCH.tar.gz
rm go$VERSION.$OS-$ARCH.tar.gz
export GOPATH=${HOME}/go
export PATH=/usr/local/go/bin:${PATH}:${GOPATH}/bin
mkdir -p $GOPATH/src/github.com/sylabs
cd $GOPATH/src/github.com/sylabs
wget -q https://github.com/sylabs/singularity/releases/download/v${SINGULARITY_VERSION}/singularity-ce-${SINGULARITY_VERSION}.tar.gz
tar -xzvf singularity-ce-${SINGULARITY_VERSION}.tar.gz
cd singularity-ce-${SINGULARITY_VERSION}
./mconfig --prefix=/usr/local/singularity
make -C builddir
sudo make -C builddir install
cd ..
sudo rm -rf singularity-ce-${SINGULARITY_VERSION}
sudo rm -rf /usr/local/go $GOPATH
Setup Bindpaths for Singularity (e.g. in .bashrc)
export PATH="/usr/local/singularity/bin:${PATH}"
export SINGULARITY_BINDPATH='/cvmfs,/mnt,/home'
CVMFS
Follow the instructions here: https://neurodesk.org/docs/getting-started/neurocontainers/cvmfs/
LMOD
sudo apt install lmod3. Use Neurodesk containers
When restarting WSL the cvmfs service has to be started manually:
sudo cvmfs_config wsl2_startInitialize the neurodesk modules:
module use /cvmfs/neurodesk.ardc.edu.au/neurodesk-modules/*Example usage of fsleyes:
ml fsl
fsleyes
List the available programs:
ml av